Hey all! It's almost Valentine's Day. DID YOU NOTICE?
Yes, the blogosphere is blowing up with handmade Valentines, candy boxes, paper flowers, etc. etc. etc. I'm getting tired of it myself. Not that some of these crafty ideas aren't AWESOME, because many of them totally are! But I've never been a big Valentine's Day fan myself.
I'm not some bitter old lady who's never had a man, either. I just don't really dig pink and hearts and flowers and teddy bears and that other sappy stuff. It all looks the same, all in support of a holiday that literally only exists to take your dollars.
(Imagine if you will that I stand on a soapbox and rant for a few more minutes about Valentine's Day okay?)
But, as you know, I do love making things, especially things for people I love.
So in honor of my love of making things, combined with my desire to be completely different from everybody else all the time (so there!), I give you:

These weird alternative watercolor mandala Valentines!
Okay so they're basically just greeting cards. :) You can use them for anything you want - birthdays, anniversaries, graduations, get well, congratulations...basically, whatever they have a section for at Hallmark, there's probably a mandala/watercolor combination that will match it.
Click "Read More" for a lot more pictures and some tutorial goodness.
For this Valentine's Day, I'm making cards for my children and my, you know, Valentine. Person. :D
So I wanted to make sure that each one represents them, or at least how I see them. Given that this is the FIRST TIME EVER that I've used watercolors (you see a lot of FIRST TIME EVERs here on My Handmade Hell), I actually think they turned out okay. I'm a watercolor fan now!
Here's what you're gonna need:

- watercolor paints and colored pencils or crayons - got kids? Then you probably have one of these art kits laying around unused somewhere.
- watercolor paper or other heavy paper
- blank greeting cards - the only ones I had have these adorable little Scandinavian owls on them. But don't worry! I have more that I plan to leave untouched.
- blank mandalas printed from the Internet - PrintMandala.com is a great resource, but honestly I found mine by doing a Google Image Search for "free mandala coloring pages"
- assorted paintbrushes
- magazines/books/junk mail that you can cut images and letters from - you'll notice I have a kid's dictionary there. I HIGHLY recommend picking one of those up if you have an interest in this kind of collage art. Looking for a specific word? It's probably in there, in nice, big, legible print, usually accompanied by a sweet illustration.
- water for dipping
- table salt
- rubbing alcohol
- scissors
- Mod Podge
Okay - to business! I wanted to try three different watercolor background techniques I learned from dear old Pinterest. The first is using clean water after painting to make the colors bleed together.
First, trace around your card onto the heavy paper. No need to stay between the lines while you're painting, but it's nice to have a go-by for this part.
Using LOTS of water and a little bit of watercolor paint, paint two contrasting colors onto your box - I chose teal and gray because those are two of my daughter's favorite colors and I like how they look together. Notice that I am not a good painter. NO MATTER! Watercolors tend to hide it if you paint like a three-year-old (as I clearly do).

Kind of blend the edges of each color together to make sure you cover all the white and that there's some good color mixing going on in the middle.
Now, take a darker teal (or a dark green) and load it onto your brush, using a lot less water than you did before. This will give you nice, solid lines.
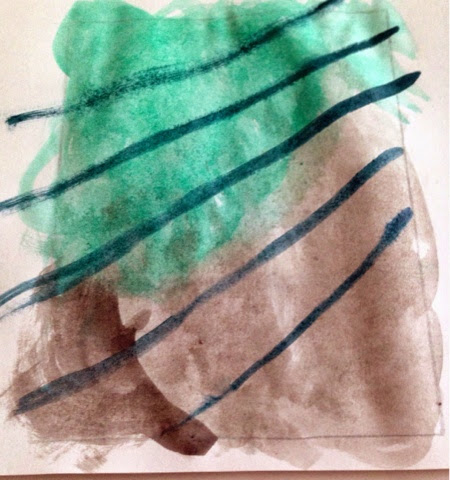
Quickly, before the stripes dry, grab a new brush and saturate it with water. Then drag the brush downwards on the page, catching and dragging the fresh green paint with it.

I didn't quite catch it in time to get the effect I wanted, but I was pleased with what did happen!

Set that aside to dry and hey, why not try a different technique?
Again, trace around a card onto another sheet of heavy paper. Paint a dark stripe of blue across the bottom. Now SUPER FAST before it dries, sprinkle some salt on it! Yes, salt! Rock salt is better, but plain old table salt will do.
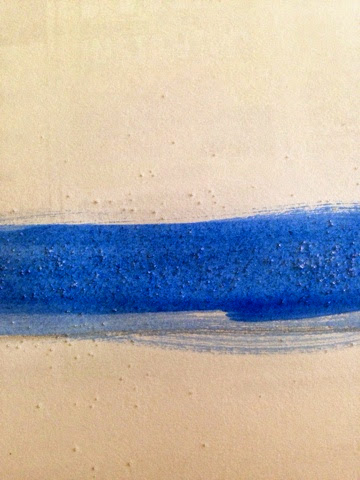
Leave it there and move on to your next stripe. Sprinkle that stripe with salt. Keep adding stripes and salt and stripes and salt until your whole box is covered. I also sprinkled my box with a little extra water to help with the chemical reaction that is apparently going to occur between the paint and the salt.

Now set that one aside to dry COMPLETELY, being careful not to knock the salt off.
Wanna try one more? Let's go for the rubbing alcohol trick!
Oh, this card had so much promise, but honestly? It's not my favorite of the batch. I was hoping for a more masculine card, but what I got was something that looked weirdly pink all over. OH WELL. Live and learn and all that nonsense.
So, paint a bunch of black (make it really wet as with the first one), covering most of the box. Fill in the empty spots with red and blue to give it some pizzazz.

Quick! Grab a bottle of rubbing alcohol! Dip a Q-tip or a paintbrush in there! DAB THE ALCOHOL ON THE PAINT, QUICK QUICK!

Sigh. Not so great. I don't really know what I did wrong there, but whatever! It's still looking good so far. (CRAFTER'S PROTIP: roll with the goddamn punches, people. It's not going into the Louvre.*)
Since the alcohol effect wasn't what I was hoping it would be (although apparently it's awesome if you do it right), I used the red to paint some extra little designs on the background.

Set that aside to dry too.
Now your watercolor backgrounds will probably take a while to dry, so while they're off being boring all by themselves, you can start on the really fun part: coloring the mandalas!

Coloring mandalas is a meditation. Try and zen out while you're doing this. Put on some nice music. Focus on staying inside the lines. Use colors that make sense to you, or get more random about it. If you don't like what you end up with, you can always print out a new one and start over.

There, that wasn't so bad. :)
Hey it's card assembly time! YAAAYY!
Grab that first watercolor background you did and cut it out along the edges you traced. Using a sponge brush, swipe a heavy dose of Mod Podge onto the front of your card, then carefully place the watercolor background on top of it. Use a brayer, your fingernails, or something round like a pencil to rub out any wrinkles or bubbles. Trim away any excess and make sure all of your edges and corners are sealed to the card so you don't get any flappage.
Now, go digging through your magazines and books and junk mail for images and words that strike your fancy or remind you of the person you're making the card for. This was my daughter's card, and the mandala has a tree in it, so when I ran across the "grow" definition in the children's dictionary, I knew that was the one. I also found a neat little green background on the side of an advertisement in a newspaper.

Position those items in a way that makes sense to you on the front of your card, then glue them down with Mod Podge. There aren't really any rules here, although I would recommend putting the mandala in the center to maintain that sense of imagery that the mandala itself conveys.

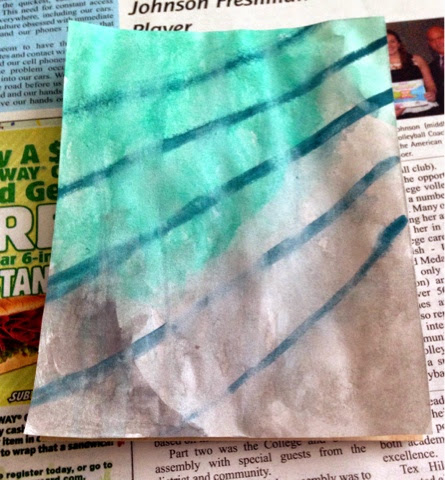
I also wanted to show you what happened when I applied the second watercolor background. Before you do ANYTHING AT ALL with it, hold it over a trash can and swipe the excess salt off of the paint.
First of all, I decided not to smooth out the wrinkles created by placing the watercolor paper onto the card. Instead, I emphasized them as much as possible by rubbing against them from both sides with my fingertips. And hey, look at this! You can still see the owl through the top, lighter-colored layers. That's kind of cool! Also, see those faint little spots and splotches? That's what the salt did. Awesome, right? I hear it works even better with rock salt. I'll have to try it because this was way fun!

Cut outs, mandala, Mod Podge, etc.

Lo and behold...three very unique, detailed, and artistic Valentines for the price of nothing (because I already had all this stuff in my craft box). I like all of them! I'm pretty pleased.

Make one! It's special and sweet, romantic and loving, and giving someone a piece of art you made is the same as giving them a piece of yourself. Vincent Van Gogh probably would have had more luck if he had just sent one of his paintings instead of his ear, for example.
IT'S ALL SO ROMANTIC!!
XOXO
*Now, look, I know I'm no artist. You've probably seen zillions of mixed-media collage-type works of art that actually DO belong in the Louvre. I know I have! But this isn't about being an "artist" the way you may see "artistry" in your head. It's about learning new things and having fun, and giving something you made to someone you love. As always, this is YOUR project and YOUR creativity. If you can't have fun with it, you're not doing it right.
No comments:
Post a Comment