Wednesday, June 30, 2010

Three Flowers - with Mini Tutes!

Well, it's been a busy week so far. My at-home business is just starting to pick up some speed, and on top of that I managed to have a nice, creative, crafty weekend. On Sunday, I think I went for seven hours straight, just knocking out project after project on my to-do list. I'll get pictures of all of them up eventually, but for now, I'll start with my favorite part:


Three flowers, each different in materials and construction, but alike in...flowery...ness. We'll tackle the one on the right first.


Cut slightly concentric circles from two coordinating fabrics. I traced around the bottom of a plastic cup, then cut just inside the trace line for the yellow circle, and a little further inside the trace line for the plaid circle. I did not worry about being exact, because this will all ruffle up anyway.


Fold the two circles in half together and cut a half-circle out from the middle. Again, preciseness is not necessary or relevant at this point (are you noticing a theme with my crafts yet?). Then you end up with this:


Next take some leftover lace - you really don't need much at all - and begin sewing a long running stitch along the edge of the inner circle you just cut, sort of catching the lace with your needle as you go. You can feel free to bunch up and fold the lace as much as you need to, because again, it's going to be ruffly. Ruffly is really good at hiding mistakes! I love ruffly!


Finally, get out your hot glue and use it to glue a pretty shank button into the center of the flower. Take one of the circles you cut out of the center of the flower and glue it onto the back. Finally, glue a pinback on it to give it ultimate versatility. The combination of fabrics, laces, buttons, sizes and shapes really makes this an exciting project.


Next! The easiest of the three: a book paper flower brooch.


Not so much a traditional-looking flower, but it kind of has a chrysanthemum appeal to it, I think.

Get thee several sheets ripped from books you no longer want or need. I recommend outdated tax law books, Windows 3.1 how-to manuals, or diet fad books that ended up killing more people than they saved. I used one of many Reader's Digest books I was given and can't seem to get rid of no matter how hard I try. I can't give these suckers away! So I'm making stuff with them.

Trace and cut seven circles out of the book pages, seeing if you can score big words like antidisestablishmentarianism or floccinoccihilipilification. You might not be able to find any of these words, but take a look anyway.


As the picture shows, you will begin folding them into sixths. So basically take a circle, fold it in half, then fold that in half, then fold it in half again. Crease firmly so they keep their folded shape. Do this to 6 circles (leave one circle unfolded - this will be your base).

Glue those suckers onto the base radially, as in, glue them so that their points are in the center of the base and it looks like you have little folded paper spokes all the way around it. Unfold the not-glued-down parts of your petals, and fluff! Glue a pinback to the back of the base. (I LOVE PINBACKS.)

Finally, the largest and possibly weirdest one: the toilet paper roll flower.

Get yourself an empty toilet paper roll and press the sides together until it's folded in half. Using very sharp scissors, cut six (or more, depending on how full you want your flower to be) slices, roughly 1/2-inch wide, off one end. Because of the fold you created in the tube, your slices will already be roughly petal-shaped.

Arrange them together and glue so that they look like a flower, like so:


I was lucky that my toilet paper rolls were a nice, not-unattractive shade of white. If yours are brown and you don't want them to be, I would recommend doing some painting at this point.

Next, glue the whole shebang to the right side of some pretty fabric (I used my yellow again). Now, I went to the great and tremendous trouble of hot-gluing along the edges of the petals and placing them carefully, one at a time, on the fabric, lamenting every spill, burn, and leak in the process. DO NOT DO THIS. It wasn't until I was done with the hot-gluing that I realized that spray adhesive would have worked MUCH BETTER. So use that instead.


You may also want to iron your fabric. Or not.

Then, carefully cut away the excess fabric around the flower, leaving only what's glued to the petals, so you have something that looks like this:


Again, it's okay if you're not really precise with your cutting, but try to get as close as you can without losing your eyesight or making your fingers cramp.

At this point, I needed a way to sort of clean up my edges a little, so I threaded an embroidery needle with some pretty pink embroidery thread and just looped it around the cardboard petals, which not only hid some of my hot glue mess, but also provided a little extra strength between the cardboard and the fabric.

Finally, I took another tiny scrap of lace and ruffled it up using the same flower-ruffling method from the first tutorial. I glued it and another fabric scrap to the front and - you guessed it - a pinback to the back. This one is considerably larger than the other two, so I would recommend it as an embellishment for a winter coat or a large bag. It's a bit too much for daily wear. But hey, it's a way to use up toilet paper rolls! If you, you know...have a need to use up toilet paper rolls. Like...I do.


Anyway, there you are! Three handmade flowers you might not have thought to make before but might try now! If you do try, I hope you'll post pictures or at least link me to your blog or Flickr stream so I can see it! Hope everyone's having a great week!

This post has been linked to the following link par-tays:

A Thrifty Home's Penny Pinching Party

<br />http://www.thethriftyhome.com


Me and My Bucket’s Show Us What You’re Workin’ With Wednesday


Someday Crafts’ Whatever Goes Wednesday


The Trendy Treehouse Creative Share Blog Hop

CreativeShareWednesdays


Women Who Do It All Idea Sharin’ Wednesday


Blue Cricket Design Show and Tell

Show and Tell Green


My Backyard Eden’s Make It Yours Wednesday
Make it Yours @ My Backyard Eden


Sew Much Ado’s We Did It Wednesday


733 Blog’s Sugar and Spice Weekly Link Party


Fine Craft Guild’s DIY Linky Party

Fine Craft Guild


make it wear it

Friday, June 25, 2010

The "Tetris" Shirt

I have a lot of "if only" statements attached to this project. If only I'd made the blocks smaller. If only I'd gotten another color involved. If only I'd put together the different Tetris shapes patch-work style before attaching them to the shirt. If only I'd sewed them on instead of hot-gluing them. But nonetheless, all of these "if only's" add up to a failed shirt. I'm actually wearing it today, though, because it's Friday and I need to figure out if I'm going to keep it or not. But here's a picture:


Doesn't look so bad, I guess. Here's one on me:


The picture makes it look worse on me than it really does. It's not precisely flattering, but it's comfy and unusual, so it makes a good casual Friday shirt, I think.

TETRIS SHIRT IS A FAIL. I'll try it again sometime, but I'll do it, you know...right.

Thursday, June 24, 2010

My Fail Equals Your Pleasure

So last night I was inspired to alter a t-shirt for my brother for an upcoming birthday. He's a hard dude to shop for, so when inspiration strikes this time of year I jump on it. I pulled out an old navy blue t-shirt and began to cut out large-ish squares from solid-colored material and assembled a Tetris board on the front. I was going to be SO PROUD to show it to you today.

After about an hour of hot-gluing, it was done. After about 10 minutes of looking at it from all different angles, I hated it. I mean, it looked kind of cool, but it definitely did not look like a Tetris board. Instead, it looked like that time Grandma's quilt exploded in a frenzy of creative overload and splattered its intricately-cut squares all over your shirt - remember that? What a mess that was.

Now I'm stuck with this weird patchwork shirt that I suppose I'll have to do something with and no post for you.

So here's some stuff other people have done that's way better:


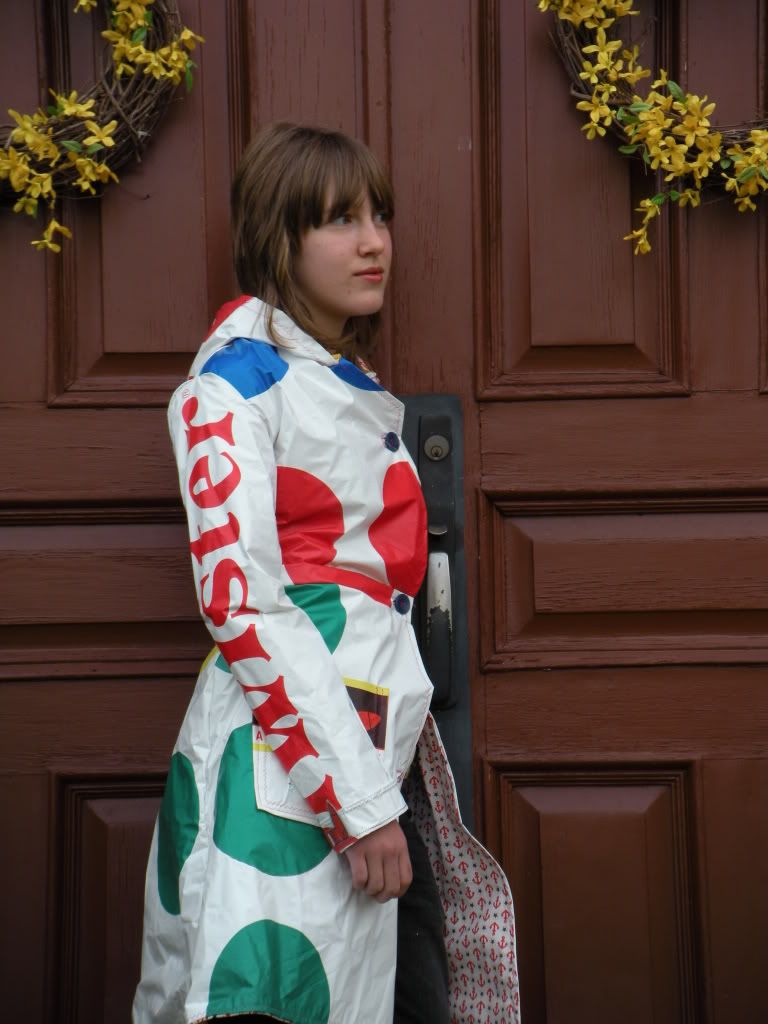
You may have seen on Craftzine yesterday this truly badass Twister gameboard raincoat that Nicoleeoliee_4_Life on Craftster.org (where else?) made in response to one of the site's notorious monthly challenges. I cannot express adequately how very much I love this, but sadly I don't think I'll be making it for myself. My husband would have too much fun with it. I can almost hear the "Right hand red!" jokes now.


A couple of weeks ago Heather of The Salty Pineapple produced these beautiful paper lanterns, which is definitely going on my "kids projects" list for the summer. My daughter recently came into a good-sized supply of beautiful origami paper that I think would be just perfect for this craft. With the right color combination, this could make an easy and elegant addition to any party. We like parties.

Finally, another Craftster find (but this one I found all on my own). Before I post the pictures, I need to let you in on a little secret (it's probably not that big a secret). I am kind of a nerd (I am a completely ridiculously impossibly hopeless geek). I occasionally enjoy playing video games, reading comic books, and I dabble in cosplay (I play Magic: The Gathering and the Star Wars tabletop roleplaying game on a regular basis, and I am listening to remixed video game music right now). As a result, certain crafts that relate to any of these little hobbies make me smile (I am totally geeking out over these pictures, and I can hardly contain my excitement).


AREN'T THEY CUTE??????

These lovely t-shirt recons were created by Serene in the clothing reconstruction section on Craftster, and I am so very deeply impressed. And she's cute as a button too!

How can I do this? Where do people find these shirts? How many times do they practice a certain design before cutting into the shirts themselves? Why can't I get the confidence to do and wear stuff like this? And other important questions!

Thanks for looking. Hopefully I'll have something for you, perhaps a new tutorial, by next week! Have a great day!

Wednesday, June 23, 2010

Anthropologie really IS inspiring.

First of all, I'd like to extend another special thank you to Stephanie at Under the Table and Dreaming for featuring my Nifty Fold-Out List Notebook on her blog yesterday. Click the Under the Table and Dreaming button under "I Was Featured!" to the right.

Now, on to the crafty stuff.

I've been seeing a bunch of "Anthropologie-inspired" stuff on various crafting and sewing blogs and forums, and to be frank, I always kind of stayed away from it because of all the hype Anthropologie was getting. So it wasn't until yesterday when, bored and itching for inspiration, I began to browse some of their wares. And I'll go ahead and say it:

I get it.

Now, a lot of that stuff is clearly designed for people with no boobs, which I am...not. And the price tags made me snort coffee out of my nose. But I guess that's why Anthropologie makes for such good creative fodder. You can take a brilliant idea and make it fit you perfectly at a truly miniscule fraction of the cost.

I did find something I really liked right away.


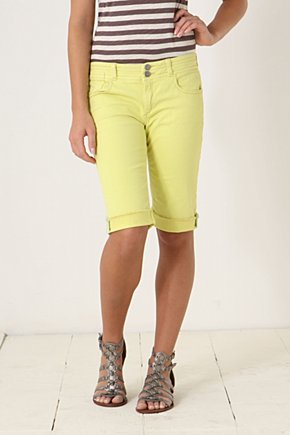
These Seven Day Bermudas seemed like the perfect solution for a pair of yellow jeans I have that are just a hair too short to look cool.

Here are the offending pants:


They were a gift from my husband's grandmother - she'd bought them and never worn them. I wore them once and loved them, but the first time I washed them they shrunk and the color faded. I guess I'm okay with the new color (but they used to be so bright and happy!), but the shrinking is not okay. I don't care how many magazines say it's okay, I do not like jeans that expose my ankles.

So I chopped off about six inches from each leg - I wasn't too fiddly about getting them exactly right or straight - then turned them inside out. According to the website, there's a bit of green fabric edging either side of the outer seam on the wrong side of the pants - so it shows when the edge is turned up. I hand-stitched a strip of green plaid fabric and let a little hang off the edge. Then I turned them right-side out again and folded up the bottom of the pants. I sewed the green plaid to the outside of the pant to hold it in place, then tacked it at a few spots around the leg.

A pretty simple operation that took about 45 minutes (just because I hand-sewed instead of using my machine), and here is the result:


(Note the "I'm so awesome" pose.)


So there we have it: the first in a line of probably many...many Anthropologie-inspired wardrobe makeovers which will give me the quality of being completely unique just like everybody else.

Tuesday, June 22, 2010

Blog Updates

First and most importantly:

I have a follower!!! Thanks so much Stephanie! I'm way more excited about this than I have any right to be.

However, it did spur the motivation in me to add a Google Friend Follower list, which is in the right-hand sidebar.

You may also find in the right-hand sidebar a bit of code you can copy if you wish to add my button to your blog. If you do, let me know and I'll gladly add yours.

Or hell, I'll just add yours if you ask me to. Leave me a comment with a link to your blog and I'll see that your button ends up on my sidebar.

Finally, if you look across the top of the page, I've posted several links to different pages within the blog. One page will contain a list of all my tutorials (which you can also find in the right-hand sidebar), one page contains a list of my favorite vendors, and finally a list of other people's tutorials, projects, and tips that you really should be looking at.

Thanks everyone! I'm starting to actually get a little excited about this blog.

Monday, June 21, 2010

I really hate the word "tablescape."

And yet here was mine on Saturday night when we unexpectedly hosted some new friends for dinner:


I'm especially proud of the centerpiece. Three tea light candles on a medium-sized salad plate (that came from the same set that we served dinner on), with assorted river rocks and home decor flat-marbles scattered around them. I like how using dark-colored rocks and clear and blue marbles gives it a sort of babbling brook effect. I'm not usually a decorator, and I know this is pretty amateur, but I thought it was very pretty.

Mondays are for Shout-Outs!

My newest favoritest blog is having a Great Giveaway to celebrate her 100+ Google Friend Followers! This chalkboard she's giving away is AWESOME, so go check it out!!


EDITED TO ADD:

Also, check out yesterday's post on Mummy Crafts - Dr. Seuss print fabric is coming! I am so excited!! Thanks for pointing it out, Mummy Crafts blogger!!!

Mummy Crafts: Fabulous Fabric... Dr Seuss

Friday, June 18, 2010

Nifty Fold-Out List Notebook

This post has been linked to the marvelous Under the Table and Dreaming Blog via her Growing Tree Toys giveaway linky party. Click this link below to see some amazing projects!

UndertheTableandDreaming

It has also been linked to the awe-inspiring and humbling Organize Your Stuff Now blog, which hosts a weekly organizational coop of sorts - all your crafty organizing ideas are welcome at the link below!

Organize and Decorate Everything


Approximately forty-five minutes before my husband sliced his thumb open with a Kiwi knife (they really are excellent knives), I began construction of the following list notebook:


I even...wait for it...wait for it...

Photo-documented my phony-journal-making adventures to create my first ever tutorial on My Handmade Hell. Now, I know that this isn't a wearable item, and I'll be honest: not everything I make will be. In this particular case, I needed a good, creative, well-designed little notebook for keeping my ideas for blog posts and my ideas for craft projects handy. What I got was a sort of schlubby, misshapen, vaguely useful pile of paper, but one I'm super happy with, and with the proper amount of time and the right materials, I'll bet someone could make something far better than this. Hence, a tutorial.

Here's what you'll need:


1. One large shipping envelope, preferably one with a misspelling on the label so it can be recycled instead of thrown away.
2. Several sheets of paper with 1/3 size lists on them. I got the Dreamy Blog Topics to Post list for free at Erin Vale Designs, and I made the Best Ideas list myself in Word. All have been printed on the backs of misprinted paper I've been saving up for a while. I have enough of each for a full year of ideas.
3. Some scrap/cheap yarn for binding purposes.
4. A paper cutter.
5. A 3-hole punch.
6. A marker for marking stuff up.
7. A variety of ribbon, lace, fabric scraps, or any other small crafty items you like to decorate the front (not pictured).

Note: Instead of using an envelope, you could use something sturdier, like the cardboard from a cereal box or something, but keep in mind that you'll need to be able to fold it down the center of the notebook.

Step 1: Use the paper cutter to slice up your lists. I really like the funky hand-made look, so I wasn't too picky about getting all the sheets the exact same size. Your preferences might dictate otherwise.


Step 2: Using the paper cutter, chop off all four edges of your envelope so you have two separate large pieces (front and back). The front will be your cover. The back will be cut into smaller covers for your list sheets.


Step 3: Set your list sheets in the middle of the cover with more than an inch of space between them. Make sure the tops and bottoms line up properly. Use a straight edge to mark around them on the envelope around an inch away from the edges of the list.


Step 4: And cut along those lines.


Step 5: Take the OTHER piece of your envelope (the backside)and lay the list stacks along the sides. Trace around them, leaving about a half-inch allowance on all sides. These will be your list covers.


Step 6: Cut out what you just traced and place it all together - cover, lists, and list covers. Now it's starting to come together!


Step 7: Use the 3-hole-punch thoughtfully to punch holes in the lists and the list covers.


Step 8: Punch holes in the cover so that they'll line up with your lists and list covers.


Step 9: Cut four fairly-equal lengths of yarn (mine were about eight inches long). These will be your binding. If you have more than two holes on each side of your notebook, then obviously you will need more lengths of yarn.


Step 10: Thread the yarn through the top left hole in the cover, and also through the list sheets. I threaded my list sheets a few at a time, but if you were more careful with your trimming than I was, you may not have to.


Step 11: Now begin threading the yarn through the bottom hole, as before.


Step 12: Now thread the yarn through the holes in your list cover. In your most atrocious handwriting, write the name of whatever kind of list you're going to keep there.


Step 13: Tie the yarn loosely around the spine. You want it to be kind of loose and shifty so that you have room to open all the pages.


Step 14: Repeat steps 10-13 for the other side.


Step 15: Look at your creation so far. See if you need to trim away any of the cover to make it seem more uniform.


Step 16: Fold the whole damn thing in half.


Step 17: Receive an emergency call from your significant other as you are taking your last picture. Frantically return all the office tools you borrowed for this project while talking to your panicked 6-year-old daughter and uploading all the photos you took onto Picasa. Go home and clean up the blood. (Not pictured.)

Step 18: Once your significant other is safely back at home with 7 stitches in his or her left thumb, pull out all your favorite pretty bits and bobs and whip out your glue gun. Tack that shit on until the anxiety stops.


Of course, as with all craft tutorials, there is no one right way to do it. You might be more meticulous than I (and I hope you are!), so yours might be all one long cardboard piece covered in beautiful fabric. Your lists might be the pinnacle of tidiness, and your penmanship just might be a hair better than mine. But the important thing is that maybe after revising my tutorial in whatever way you see fit, you end up with what I have: an idea notebook you can be proud to jot your mental overflows into whenever you need it.

Please don't hesitate to ask me questions if any of this doesn't make sense or if my photography skills are just horrible (hint: they are). And feel free to share if you decide to make one too!