Hello everybody! As you saw yesterday, I have returned from my extended absence - sorry about that. It wasn't so much that I wasn't inspired to create things, but rather that I wasn't feeling the blog. MY BAD. It won't happen again.
To make up for it, here is an easy, fun, and useful tutorial, complete with TONS of pictures! My daughter's lunch box broke so she's been clamoring for a new one. It took me a while to get around to it, but when I finally sat down and figured out how it was going to happen, I realized that it is actually a pretty simple project.
Click Read More to read more. :)
First you're going to want two different types of fabric: one stiffer fabric for the outside, and one thinner fabric for your lining. If you only have thinner fabric to work with, you can use interfacing or even quilt batting. My outer fabric (the red and white striped stuff) was cut from a heavy-duty curtain from Ikea, so it was nice and stiff.
Fold the fabric so it's nice and straight, then measure 12" up from the fold.
Cut a 12" by 12" square (with the fold at the bottom) out of both your outer and lining fabric - so essentially you've just cut a 12" by 24" rectangle.
Unfold the fabric and refold it the other way, so right sides are together for both. Sew along the two sides leaving an opening at the top. Stitch about 1/2" to 1" away from the edges, and BACKSTITCH two or three times (this bag is going to go through hell so you might as well prepare it):
Now put your hand inside one of the bag shapes and kind of floof out one of the bottom corners.
Turn the bag on its side and press that corner down so that it's going perpendicular to the shape of the bag. Basically you'll end up with a triangle point with your side seam coming across the top of it:
You're going to sew a straight line across, creating an equilateral triangle at the corner. Sew across right here:
Once you've sewn that line on both of your bottom corners (BACKSTITCH), trim away the excess triangle part of the fabric, and you'll end up with a boxed bottom for your bag:
Repeat for the lining.
Now, with the outer fabric right side OUT, and the lining fabric right side IN, tuck the lining inside the outer bag. Be sure to line up the squared-off edges at the bottom so everything is nice and straight.
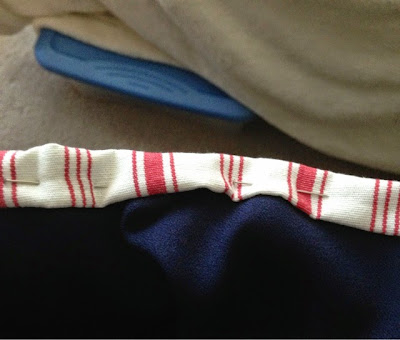
Next you're going to create a rolled hem - fold both the outer and lining fabric in at the top about 1/4", and then fold it another 1/4" so the raw edges are tucked inside the hem:
Do this all the way around the top of the bag, pinning as you go:
Take the whole thing over to your sewing machine and stitch the hem down. As you can see below, you may want to stitch it relatively close to your first fold to catch any uneven edges:
Now you have a bag!
So cool, right? Now to handle closure and handling.
Fold down the entire top opening of the bag (front and back) by around an inch:
Then fold it down again another inch (just like with the rolled hem):
Carefully unfold the last fold you made and mark it, 3" from each side, on the front of your CURRENT fold, and the point where that first mark would meet the front of the bag, like so:
This is where you're going to place your velcro!
Which you will adhere to the fabric using my new favorite adhesive, E-6000's Fabri-Fuse (or you know, whatever you want - you can hot glue it, use another fabric glue, or even stitch the velcro down):
The instructions on the bottle say to put glue on BOTH of the things that are being glued together. I've found this to be an accurate statement. Apply glue to the area around your marks, AND to the back of the velcro patch. I put the male end on the front of the bag and the female end on the part that folds over, but I don't think it matters how you do it:
LEAVE THAT TO DRY. Seriously. Don't screw with it. Fabric glue takes a LONG time to dry.
While you're waiting, cut another piece of your outer fabric (or your lining fabric for a cool look) roughly 4.5" by 11":
Fold it in half, right sides together, and sew along one short edge and the long edge. Turn it inside out to create a long tube that's open on one short end:
Tuck in the edges of your open end and sew down. Then fold the entire strap in half and sew it together at the short ends, so you end up with a loop like so:
Glue that onto the back side of your bag (in between the two pieces of velcro that will be folded over to meet the ones on the other side):
Let the WHOLE THING DRY for SEVERAL EXCRUCIATING HOURS.
Now, if you're me, you'll check back after those SEVERAL EXCRUCIATING HOURS and discover, to your extreme displeasure, that the velcro you used, which was very old ("vintage"), did NOT properly stick to the fabric glue, and simply peeled right off of the fabric.
At that point, you will, in utter frustration, simply sew the damned velcro onto the insides of the top of the bag and call it a day.
TA DAAAA!!!
An adorable and useful lunch bag that holds a person's lunch beautifully!


No comments:
Post a Comment