Happy Halloween! (FINALLY!)
We have been a BUSY Handmade Hell family this week. I don't know how the month got away from me already, but I found that my kids were essentially COSTUME-LESS as of the beginning of this week.
GOD NO!
Any good crafty mom worth her salt would DIE before allowing such a travesty to befall her offspring! The vicious side of my maternal instincts kicked into high gear and I spent hours...and hours...and hours planning, cutting, re-cutting, gluing, sewing, and assembling these costumes.
I even managed to throw one together for myself. :)
Click Read More for full pictures and some fun mini-tutorials!
My darling, Dr. Seuss-obsessed son wanted desperately to be The Cat in the Hat for Halloween this year. Well, that seemed easy enough.
I managed to put together a pretty simple costume for him: black pants, a black shirt (okay so it was dark green but it's going to be night time when people see it, so THERE), a little white-patch bib-thing with attached bow tie which I just stitched onto the t-shirt by hand across the top with a long running stitch, so it could easily be removed and the t-shirt could be returned to its original use.
And, of course, a hat. :)
The hat was pretty easy actually. I kind of built it up in my head to be a lot more complicated than it actually was. We wanted some definite structure to it, so rather than stitch together a floppy felt-only hat, I found the perfect base: a cardboard oatmeal container! I ALWAYS save these things because they come in handy so often.
From that point it was just a matter of measuring and cutting strips of red and white felt the right width and hot-gluing them in place. The felt I had was just a few inches too short to go all the way around, so I had to patch up the back of the hat - but it doesn't look that bad, and of course from the front nobody will ever notice.
Even the brim was easier than I thought it would be! I just placed the oatmeal container on the white felt and traced around it, then sketched out a circle about two inches wider (or basically as wide as the felt piece would accommodate). I cut out the larger circle, then cut into the inner circle like a pie. It's hard to describe so I drew a diagram. It's a pretty terrible diagram but hopefully it gets the point across.
Then I placed the white circle against the bottom of the "hat" and folded the triangles down into the inside of the container, gluing them in place with hot glue. The brim stayed put pretty nicely! Then a short piece of elastic topped it off. Er, bottomed it off.
Ahem. I glued a short piece of elastic to the bottom so it could go around his head.
Here's the full effect, including makeup:
On to the most challenging of all three costumes. My daughter wanted to be a Weeping Angel from Doctor Who.
You know:
Basically the scariest villain to ever grace the small screen.
I didn't even have time to take pictures of the dress while I was frantically sewing it, but it's a pretty basic dress. I used a lightweight charcoal knit jersey and basically traced around a long-sleeve shirt she has for the top part, then added a waistband and a long (long, long) pleated skirt. I had accidentally cut the neckline too wide, so I stretched a short piece of elastic across the front and back of the neckline and stitched it in place. This also allowed for a little bit of gather in the bodice part of the dress, which added accuracy.
Love that dress. Bought that wig. Made those wings.
Those. Wings.
I did take pictures of this part, for posterity and proof that I actually made them. I had NO idea what I was doing going into this part. I've never made anything like this before. But I couldn't let a little thing like ignorance and complete lack of relevant experience stop me! I pressed onward.
I took a piece of foam board I had leftover from another project and sketched two roughly Weeping-Angel-shaped wings along with a rectangular piece that will lay against her back.
Using a combination of a kitchen knife, an Exacto knife, and pointed and very obscene language, I cut the wings out.
I scored the back of the rectangular piece just a little and bent the wings upward.
I used an awl to punch four holes in the rectangular piece...
And threaded some long lengths of yarn through them to hold the wings up on her shoulders (this picture is the part of the apparatus that would be showing from the back):
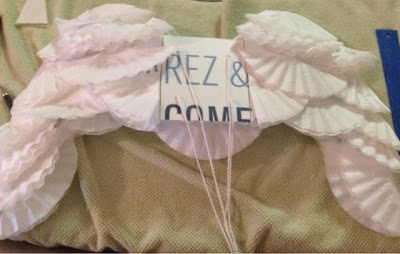
Then I taped a shitload of coffee filters on the front, or the part that would be seen by everyone. It's literally scotch tape and coffee filters, folded in various ways.
Then I did the same to the other side, but only to the wings because I didn't want anything to get in the way of the strings.
I had some gray temporary hair spray I was going to use in her hair and I figured that might work to give the wings the right color.
I WAS SO WRONG.
Not only did I use the entire can on half of the wings, but it was glittery, far too light, and was coming off on my fingers every time I touched it, even hours after it dried. I figured it probably wouldn't work for her hair either.
So off to the big box store I went, where I purchased a $6 old lady wig and a bottle of pewter-colored acrylic paint.
Paint, paint, paint.
Much better!
Full (terrifying) effect:
Now, it's been years since the last time I dressed up in an actual costume for Halloween. I tend to think in terms of crafting a costume from scratch whenever I ponder it (which is every year), and that just becomes too much work. It literally never occurred to me that I could put together a perfectly good, recognizable costume from pieces in my own closet.
I give you...Holly Golightly from Breakfast at Tiffany's!
I'm pretty proud of this one. And it was way simple! Just a simple black dress:
A sock for the sock bun (seriously - I thought "sock bun" was a cute little phrase, but it actually is a rolled up sock around your hair):
Last year I picked up this two-pack of sparkly hair combs from Charming Charlie's for probably $8. The larger one, below, was the perfect size and shape for the front of my bun:
And then for the FABULOUS necklace, I took this old double-strand faux-pearl necklace I've had forever...
And the other smaller comb from the Charming Charlie's purchase...
I bent the comb teeth upward, which was really super easy to do because Charming Charlie's is cheap for a reason:
And then just slipped the bent teeth over the pearls.
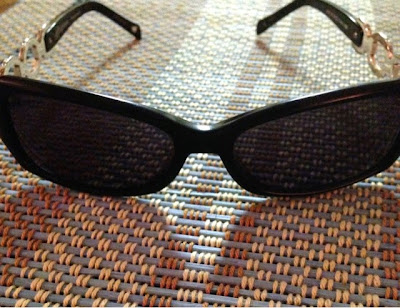
Topped it off with a fresh pair of sunglasses:
And a handmade cigarette holder, made out of strips of black and gold fabric wrapped and glued around a drinking straw:
Overall, I think the effect was pretty good.
I mean, not to brag or anything, but...
It's pretty damn close, isn't it?? Yeah I like it a lot. I only wish I'd had time to throw together some gloves, but whatever. It's just one night.
ONE AWESOME, SPOOKY, WONDERFUL, AMAZING NIGHT FULL OF FUN AND THRILLS!!!
I love Halloween. I had such a great day and such a great time making these costumes.
HAPPIEST OF HALLOWEENS, MY LOVES!!
XOXO


No comments:
Post a Comment