Saturday, December 14, 2013

Lemon Blueberry Muffins

After a fun evening of wine and fried things from the local Chinese delivery place, I ended up going to bed super early. As a result, I woke up at 6:00 fully refreshed and ready to start my day. My first thought upon awakening was "what is that amazing smell??" As it turned out, my houseguest had also arisen particularly early and had, while I still slumbered, browned a beef brisket and put it in the crockpot, where it is currently still making me crazy as it cooks.

I decided I wanted to get in on the productive early morning cooking from scratch train and realized I had all the right ingredients to make muffins. 

I used a recipe I found online but tweaked it so I'll put what I did here:

Ingredients:

2 cups all purpose flour
1 cup sugar
1 Tbsp baking powder
1/2 tsp salt
(Mix these ingredients together and set aside)

In a separate bowl:

Beat 1 large egg
Add 1 cup of milk (I used vanilla almond milk)
Add 1/4 cup oil or melted butter (I used melted coconut oil)
1 tsp lemon extract
1 Tbsp lemon juice
Whisk all together

Make a well in the center of the dry ingredients and add wet ingredients. Fold all ingredients together carefully with a rubber spatula. Add about half a pint of fresh blueberries. Don't over mix or they will be tough!

Spoon batter into muffin tin or silicon or foil cups until about 3/4 full. Bake 25 minutes in a 400F oven. 

These muffins turned out beautifully...light and chewy on the inside, sweet and slightly crunchy on the top. The lemon is a little strong, so I might not use the lemon juice next time. And they're not too sweet, like store bought muffins can be.

I imagine they smell great. But I can't smell them over the scent of that brisket...oh my. We're going to have the best French dips for lunch!


Wednesday, May 29, 2013

Vegetarian Chili Mac

Time for another non-wearable post (unless you're my 7-year-old son, who is currently wearing this particular handmade on his shirt)!

I like macaroni and cheese. I really, really like macaroni and cheese. I would venture so far as to say that it is my favorite food. Even the stuff in the blue box. And my kids, being kids and all, absolutely love it. That being said, I have kids now, which means I am saddled with the sometimes depressing and often challenging task of providing them with mostly healthy meals most of the time. Macaroni and cheese doesn't typically fall into that category.

But oh! The convenience! The frugality! How can I possibly turn down a 50-cent box of creamy delicious mac and cheese?

So I use it, but I add to it. Sometimes it's just peas, sometimes it's something more elaborate. Take a healthy thing, stir it into some mac and cheese, and generally kids will eat it. It's a time-honored tradition among busy moms to do just this kind of thing.

Today, whilst tooling around the city with a good friend in tow, I mused, "What should I make my kids for dinner tonight?" His immediate response: "Chili mac."

Now, my kids are vegetarians, so at first the idea of chili mac didn't make a lot of sense. Until I remembered, of course, that vegetarian chili is not only possible, but delicious. And I happened to have a variety of delicious potential chili ingredients in my house. It couldn't have been more perfect. I made the chili (TONS of leftovers - TONS!), made the mac, and stirred them together to make...oh my dayum. Just look:

Hummuna hummuna nom nom nom nom...

And now, the recipe:

Vegetarian Chili Mac
(serves 4)

Ingredients:
Olive oil
3-4 cloves of garlic, chopped
1 medium onion, diced
1 medium green bell pepper, diced
2 medium carrots, diced
1 medium cucumber, diced
1 cup brown lentils
1 cup hot water
1 cup vegetable broth
1 can black beans
1 20-oz can diced tomatoes
1 can tomato paste
1 Tsp chili powder (or to taste - I made mine mild for the kids)
1 Tbsp chili sauce
salt and pepper
1 box macaroni and cheese
1/2 cup milk
2 Tbsp. butter

Instructions:
1. Heat olive oil in the bottom of a large sauce pot.
2. Add chopped garlic, onion, bell pepper, carrots, and cucumber, and saute until onion is translucent.
3. Add lentils and saute for 1 minute.
4. Add hot water, vegetable broth, black beans, and tomatoes.
5. Bring pot to a boil, then reduce heat to simmer.
6. Add entire can of tomato paste and seasonings.
7. Simmer for 45 minutes, covered with lid tilted for ventilation.
8. During last 10 minutes of chili cooktime, cook mac and cheese according to package directions.
9. Once chili and mac and cheese are done, add chili to mac and cheese a spoonful at a time, stirring constantly to mix thoroughly. Stop when the mixture appears to be 50-50, or whenever you want really.

My kids gobbled this up, and I had a second helping. The creaminess of the macaroni and cheese really mellows out the intensity of the chili, making this a highly accessible, remarkably edible, pretty darn healthy version of a classic favorite. I THINK SO ANYWAY SO THERE.

Sunday, April 28, 2013

Superest Salad Ever

It's been a while since I've posted, and although I have had inspiration and have even made a thing or two, I'm not quite ready to expose them to the universe yet. However, I made a hell of a great salad today so I thought I'd share that with you.

The other day I placed an order through Greenling.com, a sort of multi-farm coop plus health food grocery website, where you can order food, particularly local and organic produce, to be delivered to your door. While I can see why this would be a terrific service for some, I don't think it's really right for my family. I prefer selecting my own produce, and I would rather support my local area farmers more directly by buying from them at the farmer's market.

That said, I did get a pretty cool assortment of veggies, none of which were quite enough to feed me, my kids, and my parents this weekend, but many of which came together in a pretty beautiful way.

Ingredients:

1 small head of Romaine lettuce
2 cups loosely packed baby spinach
1/2 red bell pepper
1/2 orange bell pepper
5-6 medium sized carrots
2 large radishes
1/4 head cauliflower
1 cup micro greens
1 can garbanzo beans
1 can kernel corn
Parsley to taste
1/4 cup bottled raspberry vinaigrette

Chop the greens, peppers, radishes, cauliflower, and parsley roughly (I diced them so the pieces would be small and easy to eat). Shred the carrots. Mix all ingredients together, including the drained cans of garbanzo beans and corn. Toss with dressing and serve.

This was delicious, filling, and entirely vegan, and very very healthy. Even my kids liked it! Well, my daughter did. My son balked a little, but not too much.

Of course, this is just what I had on hand, so obviously it'll be different every time. It's hardly a recipe at all, but I loved it. All the different textures and fresh flavors came together really made it special, and the garbanzo beans gave it a protein boost that made it filling and a whole meal by itself. It's been a long time since I've been so satisfied by a single salad!


Friday, April 12, 2013

A cabinet for filing things!

So this isn't a wearable, which is kinda sorta against the rules, but I have been wanting to fix up an old filing cabinet for so long that when I finally got a chance this week, I realized I had to share it with the world! (I don't actually think anybody reads this blog but me.)

I found this beauty at a garage sale for the absurdly and hilariously low price of $3:


Here it is in my trunk, all happy because someone bought it (and on the last day of the sale too!) While it was the striking color that first caught my eye, after close inspection I learned that the drawers sat properly in their rails, the handles were solid, there didn't appear to be any rust (I found some on there later, but only a tiny bit), and it had the little metal dividers in both drawers. A great find for only $3!!

I took it home and started to work on getting that awful contact paper off. I used a combination of Vinegar Multisurface Windex, a plastic scraper, and patience to get every scrap of it off:


Worse than the contact paper though was the duct tape. EEEEWWWWW. (I have a weird phobic issue with sticky stuff.) I wasn't able to get all the adhesive off, but you can hardly tell now.

When I finally got all the contact paper off, I realized why they had put it there to begin with. The paint on top was in lousy shape:


And I began to notice other places on the sides and front of the cabinet that had chips and scratches in the paint as well:


I was sad because I'd hoped that I could salvage the paint job. But I couldn't, so I bucked up, put on my big girl panties, and sanded the crap out of every surface to get off the dirt, rust, and to rough up the texture a little so it would take new paint better. Then I ran to Home Depot and came home with this:


Rust-Oleum Painter's Touch in Paprika and Sage Green. They were literally the first two colors I saw that I fell in love with, so I grabbed them for less than $4 apiece (I had no idea spraypaint was so inexpensive!! I am in trouble.) and ran back home with some sort of plan in my head.

After consulting with my 9-year-old, who is the real artist in the family, I decided to paint the main body of the cabinet green and use the paprika as the "accent" on the drawer facings.

First coat:


I touched up the drawer pulls with some black paint I had laying around, reassembled the whole thing (after letting it dry of course) and here is the result:


Yes, I loved the orange, but frankly, these colors work better with my decor, with my life, with my taste, and with my happiness factor. I couldn't be more pleased with how this turned out, and even though it isn't wearable, it is yet another item that goes on my list of things I will be leaving hell with.

Sunday, March 31, 2013

Last Sweaters for a While I SWEAR!

So look.

I love sweaters.

I really do.

SUE ME.

Problem is, sweaters don't work well in a place that's basically just hot all the time. Sure, there are a few months a year during which having a little extra warmth cuddling around you is pretty useful, but then the sweaters get tucked away into Rubbermaids or back closets, sleeping with the moth balls until we find use for them again.

Right around now, in this part of the country, sweaters go on major sale at Goodwill and other thrift stores. It's very exciting but a little sad to see them all, because we really don't have a good way to show them off to the world until it gets chilly again. Plus, you never know when you'll spot the perfect sweater from across the store, only to discover that it has holes, stains, or spots that have worn through.

So I've compiled a little list of things you can make from sweaters that are not, well, other sweaters.

First on the program is this juicy little number that actually made me gasp out loud when I saw it:


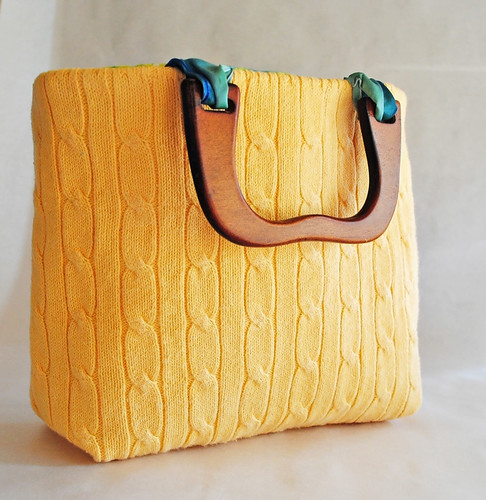
It's a sweater purse! A Lemon Squeezy Home has put together a brilliant and easy-to-follow tutorial for this adorable little thing and I can NOT wait to make one. And I'm serious. I even have a purse with awesome handles that I'd be willing to cannibalize for something like this. I could even see picking up a bigger sweater and turning it into a laptop sleeve.

Here's another awesome example of a good idea:


Found on the always fabulous Make It Love It blog, also with a super easy tutorial, this adorable little sling bag could be stitched up in a couple of hours and made in a variety of colors. One for every day of the week, I'm thinking. And people told me I had too many purses before! Hahahahahaha. Hahaha. Haha. Oh my. I'll show them. I'll show them all.

Here's another cute idea, not wearable but totally doable:


Featured in a post on the Schmath blog, but not linked to a tutorial, I can't see how these would be that hard. Pick up a cardigan with an interesting texture, cut out the pieces, sew them together, stuff a pillow form in there...and done! This could really cozy up a cold living room in no time flat.

Here's a simple but effective recon:


This Mama Makes Stuff made this stuff right here - a cashmere baby blanket, ooh la la! Only for the babies with the most sophisticated and high class taste.

Finally, this one made my heart stop and then I immediately started making insane plans:


I just oh my god I don't even.

Yes please.

(From Country Living.)

Okay I promise I won't cover sweaters anymore. For at least...a month. Two. Maybe.

Sunday, March 17, 2013

Kids Go Handmade! (Banana Edition)

Yes I said banana edition. Bananas!!

Friday was my son's seventh birthday. My son loves bananas. Nobody loves bananas more than my sweet boy.

So my daughter made him a banana out of felt for his birthday!

She's a creative little sprout, huh?

We also made a truly delicious trifle with angel food cake, banana pudding, fresh mixed berries, and walnuts. It was SO good!!! Best birthday cake ever. :)

Also, see below for my daughter's other great creation for the week: an evil paper mustache.


Sunday, March 10, 2013

Color Block Skirt

So you remember how just a couple of days ago I was posting about color block recons and how much I love them and how much I'm inspired by them?

Well I found myself today with a few hours to spare, a Buffy marathon on Netflix, and a couple of garments that had seen better days, so I just decided to go for it. I didn't have a plan, I didn't have a design in mind...well, I kind of did, but after I cut everything to pieces I realized it wasn't going to work, so I had to figure out something else on the fly. And when you think about it, gazing in befuddled panic at a virtually useless pile of scraps in front of you is the best way to design. Really. Honest.

This is what I made:


Which I think is pretty darn cute, and something that - again - I can actually wear somewhere. Not sure where. But OUT. In the WORLD. Instead of just prancing around in it at home because it shouldn't be seen by eyes other than mine.

No, this is hella cute and I love it. It feels very feminine and pretty, and it does give a similar feel to the ones I displayed in my last post. The color blocking process was really fun, and it was exciting coming up with a cute way to put these three completely different fabrics together.

The main green part came from this dress:


 Which was sweet in its own way, but definitely dated and not terribly flattering. Also, I never wear strappy dresses, not even with something over it. I am ALWAYS worried that my bra will show (you don't even want to see the BACK of this thing...bra-city).

So I cut it to pieces and combined it with a schoolgirl skirt in neutral colors and some vintage elastic lace, and I am really glad I like the result because otherwise I would probably have cannibalized it to get that lace back. But I am happy with what happened today, and very proud to put this new thing in my closet.


Friday, March 8, 2013

Restyle Roundup!!


Time for another restyle round-up! I am in love with everything I posted here, but I wanted to give you a good old-fashioned disclaimer here:

In this blog post, I have posted links to Etsy shops that are selling upcycled clothing items that I would like to try making. Please keep in mind that I am only using these photographs as inspiration for myself and others, and it is not my intent to encourage or teach people to make their own when somebody has already put the work into beautiful garments and are trying to sell them on Etsy. This isn’t like crafting your own Anthropologie-inspired clothing – I know that it is crucial to keep the market friendly for independent artists like the ones I’ve featured here. So please, please, if you possibly can, visit these sellers and buy something – their work is worth every penny and by no means do I intend to degrade them by saying things like, “I could make that!”

Now that I’ve made myself clear, here are some really gorgeous finds I came across this week:


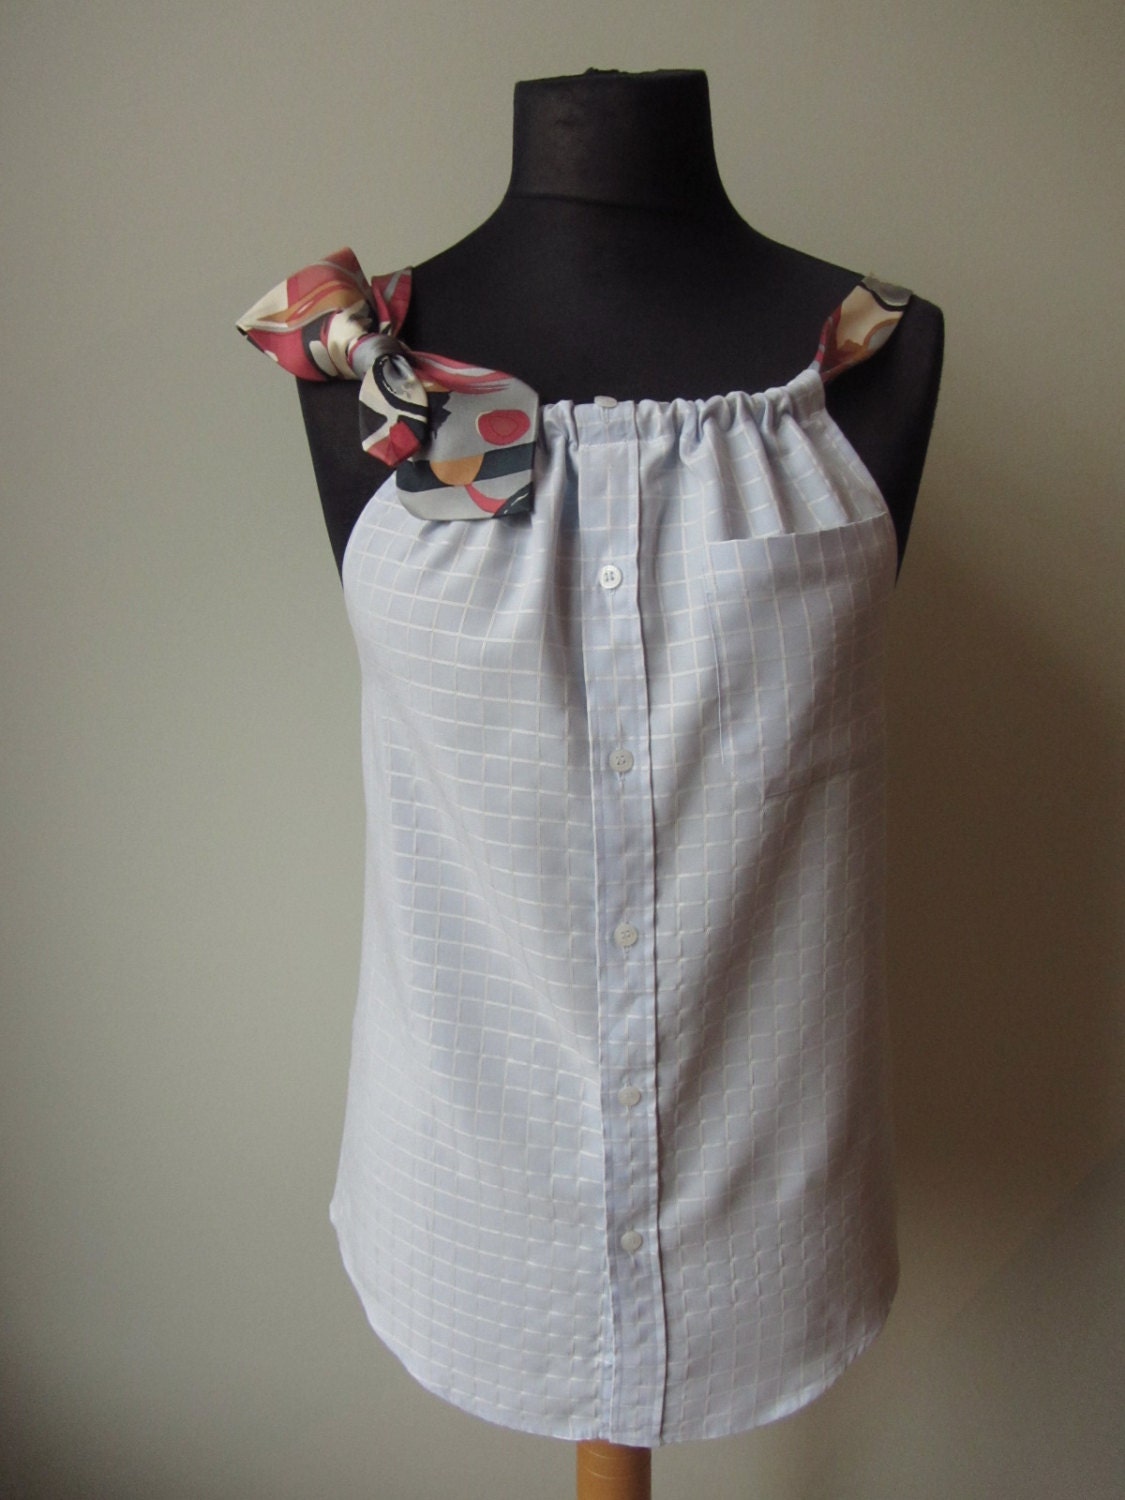
Here’s a gorgeous little simple tank restyle from a man’s button-up shirt by GarageCoutureClothes on Etsy.
I’ve seen restyles like this before, but I think what I like about this is the menswear-inspired elements that she kept in the tanks – leaving the pocket, for example, and using a tie for the straps. Really cute, and adds a little class and sophistication. Mine would probably not be nearly as polished as hers, but I could definitely see one of these cropping up in my future crafting goals!

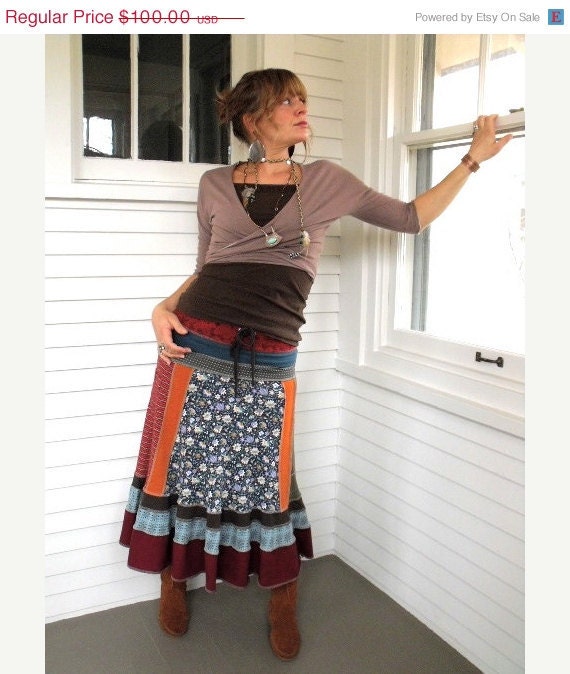
I’ve also been way into the color-blocking style of upcycling too: the kind of garments that look like they came from lots of different sources. They’re like beautiful, creative, wearable quilts, but with modern lines and structure. For instance, take this amazing maxi skirt by zasra, also on Etsy:


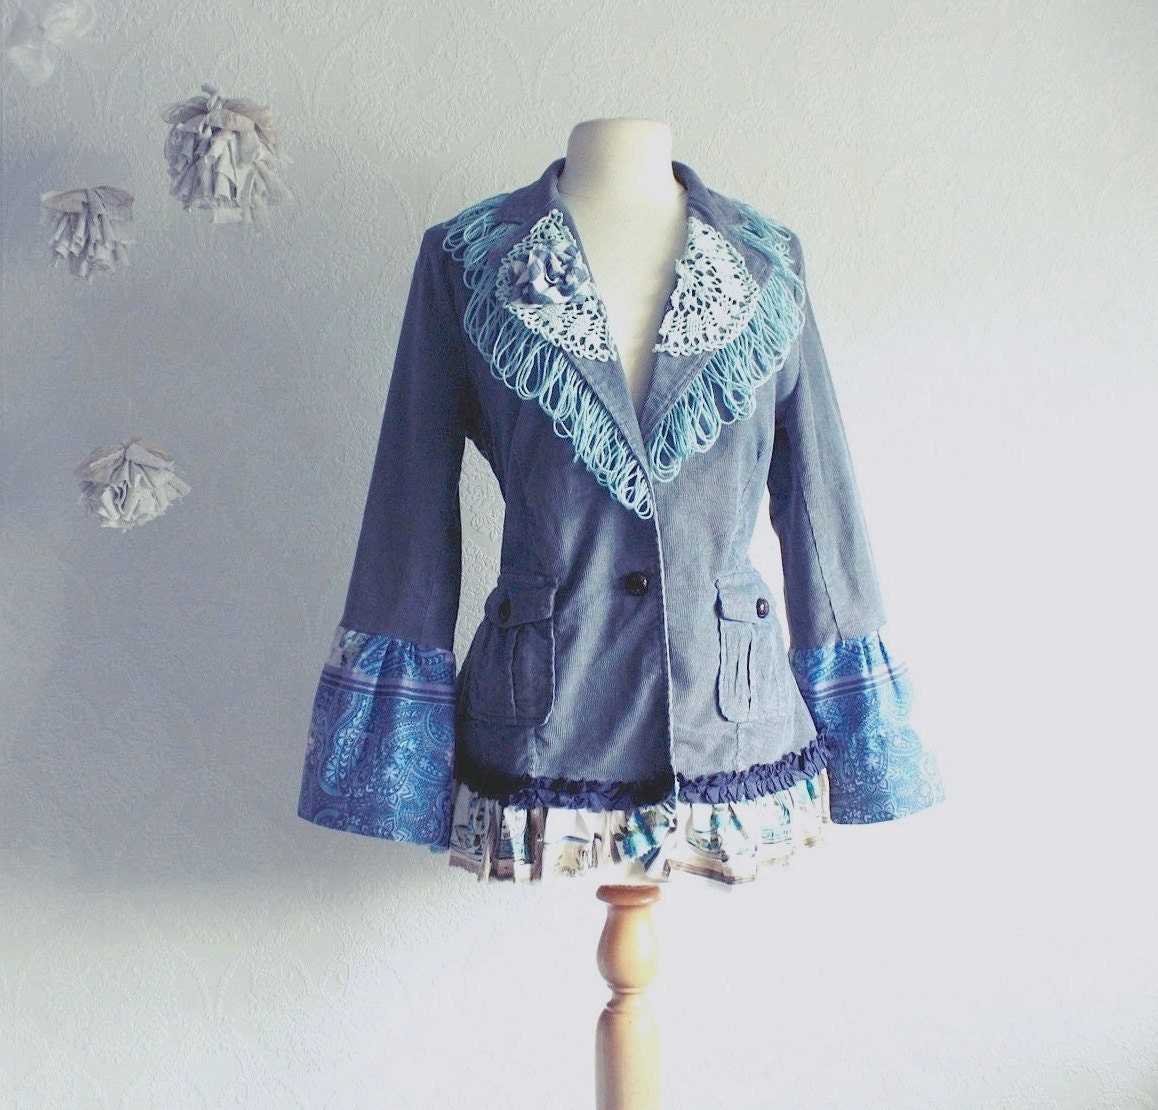
Or this SUPER special blazer by Broken Ghost Clothing (Etsy again – can you tell what I’ve been doing?):


Or this sweet little tank top, also by Broken Ghost Clothing (in fact, just go browse that whole shop: http://www.etsy.com/shop/BrokenGhostClothing - everything in there is gorgeous!)


What I love about this tank is that it is FULL of great ideas – the little triangular insert in the side seams to give the shirt more flare, the multi-layered “skirt,” the ruffle on the front – it looks like with a basic tank, some pretty, compatible fabrics, and a moderate level of skill, you could emulate this look!

I can’t wait to try my hand at work like this – combining two or three or even four garments into one could be deeply satisfying, exciting work with truly unique results!!

Sunday, March 3, 2013

I MADE A THING!!!

So I did it!

I wanted to make something, I thought about making something, and I said SCREW IT and I made something!

THIS IS THE THING I MADE!!


See how excited I am? THAT'S HOW EXCITED I AM!!

This shirt started off as kind of a schlumpy long-sleeved hooded tee that my mom got tired of and passed along to me. I wore it a few times but never liked how it looked and it never quite fit me right anyway. So I decided it was time to cut it to pieces and see what happened.

Here was the comfy yet unflattering garment before I attacked it ruthlessly with my scissors:


Not so great, right? And I don't know if you can tell or not, but the hood was just short enough that it tugged upward on my shoulders whenever I wore it, making it completely useless as a hood. So I laid it out on my horribly stained cutting mat and chopped off the sleeves:


Then I cut away the hood:


Then I basically tried it on and took it off and snipped and chopped and tried it on and took it off and snipped and chopped over and over again until it was fitting me perfectly as a tank. I did have to shorten the straps a little to bring the underarm up because the sleeves left a pretty gaping hole.

I could have left it as a tank, but I was specifically wanting to turn this into something kind of girly that I could wear out with friends or to a party or something, so I opened up the sleeves:


And cut away the rounded top part of each one:


And pinned the straight edges to the outside of the armholes on the shirt to make little cap sleeves. I also "ghetto-lettuced" the edging because I don't have a serger - I just picked a nice tight zig-zag and stretched the hell out of the fabric while sewing along the edge of the cap sleeve. Anyway it turned out looking like this:


Which isn't super awesome, but it'll do. Makes it a little frilly and covers up the ragged cutting job.

I don't have many pictures of this next part, because it was really hard to do it and take pictures at the same time, but let me see if I can describe it well:

I took the rest of one of the sleeves and cut it into strips about an inch wide, then I sewed the short ends together until I had one long, 1"-wide strip. Then I took a length of thread about the same measurement as the front scoop of my neckline, and I hand-sewed a running stitch down the center of the fabric strip, gathering along the thread as I went to create a ruffle.

Then I pinned the ruffle to the neckline, sewed it down, and then I declared myself DONE and had a nice bowl of noodles in a spicy cream sauce.


YAAAAY FOR MAKING THINGS!! I will probably be this excited about making things the next several times I make things, so just be prepared for that.

I can't wait to wear it somewhere! I think I'll wear it tomorrow!

Kids Go Handmade Too! Kirby Edition

My daughter is 9 and started sewing about six months ago. She's already made some pretty adorable toys with just felt, thread, and stuffing. Today it was video game icon Kirby. Marvel in my child and her boundless creativity! She designed the toy, cut out a pattern, selected her materials, and sewed the entire thing herself...in just two hours! She's a genius, AND a workhorse. I couldn't be prouder. :)

Saturday, March 2, 2013

Coolest carrots ever

Just thought I'd share these awesome carrots I got at the farmer's market this morning. They are delectable! And going into a veggie-rich pasta sauce for my kids and my parents (all vegetarians).

Friday, March 1, 2013

WIP report

First of all, I'm posting this from my phone for the VERY FIRST TIME OMG. So it could suck. Don't judge me...judge the Blogger app. Unless this post is awesome, of course, in which case it was all me baby!

I've got a couple of things I'm actively working on, so I thought I'd share.

First of all, I suppose I need to briefly explain Nerd Wars. On the prolific fiber arts site known as Ravelry.com, Nerd Wars serves as a place where nerds, geeks, and obsessives of all types can come together and inflict massive, global-scale bloodshed upon one another in the name of creativity based upon our favorite nerdery. You sign up for a team (i.e. Team Tardis for Who fans, Team Precious for LOTR fans, Team 1-Up, my home team, for video games, etc.). You get five challenges a month, and each person who can knit, crochet, weave, or spin a project which answers that challenge wins points for their team, with bonus points every time you can tie your response into your team's nerdly obsession.

A tournament lasts three months, and at the end of the tourney, all points are totaled and a winner is declared. It's not usually Team 1-Up, but hey, we are literally the only team that cannot participate in both knitting AND our nerdery. It's physically impossible to knit and kick Ganon's ass at the same time.

During each tournament you can elect to create a dissertation, or a project that will reasonably take you 3 months to complete. I almost always try, but rarely succeed. However, this time? It is ON. I have the best pattern, the best yarn, and enough motivation to make a bull meditate in a China shop. Here is my progress on this project so far:


Valiant Return and More Sweater Recons!!

I've learned some things in the last two years:

1. You DO have to pre-wash dishes before you put them in the dishwasher.
2. If you spend 10 minutes wiping down your kitchen with a Clorox wipe every night, you don't have to spend an hour scrubbing the stove once a month.
3. Good things don't always happen to those who wait - usually you have to take ACTION.
4. We can actually do anything, and we are a hell of a lot stronger than we think we are.

I've experienced some major life changes recently, some of which I'll be exploring in this blog, and some of which I'm going to leave well enough alone. No point in dragging certain things up over and over again.

I don't know that I'll always have crafts to post, but I'll always have something to say, someone to praise, or someone else's project to drool over - I usually do. Time is short, and life is short, and this blog post is short, but we can make it all seem longer if we want to. We have our whole lives ahead of us, and our lives will last at least as long as we're alive.

Of course, it's a little harder to get excited about my whole life being in front of me when I figure how many times that means I have to clean my kitchen for 10 minutes a day. Hell, it's hard for me to get a shower every day (TMI?).

Here are some great projects I found that I love monstrously:

Posted a few months ago to Craftster.org by lidehtium, LOOK AT THIS COAT OMG:


It's made from M&@(*T%&@NG OLD SWEATERS!! I want to do this SO bad. I could do a bunch of these, I think, all different styles and colors and materials and each one would be amazing and unique. She describes it as one hell of a labor of love, but I am too inspired by the OMG PRETTY to not daydream real hard about this one. (By the way, check out her blog here: Tamed Raven - it is the epitome of simple gorgeousness.)

Here's another old, old post (from December of 2011!) from my new favorite blog, Lately Reconstructed:


You know what those are? Those are slippers. Made from sweatshirts. Simple, easy, and BRILLIANT, because honestly? I could definitely do with one less sweatshirt and one more pair of slippers. I imagine if you get a big enough sweatshirt, you could even just use the sleeves - then you have a whole torso part of a huge sweatshirt to mutilate play with.

Finally, from a site I literally had to jump on, copy the URL, and jump off again for fear of losing my ENTIRE DAY to this site's database of incredible clever amazingness, Cut Out and Keep:

OMG LIGHTNING SWEATERS!!!!! DO WAAANT!!


I can't even fathom this. I will make zillions of them. It's SO simple! Please click through and check out this tutorial, you will be amazed by how easy it is.

I think I post a lot of sweater recons here, which is kind of silly since I live in Texas and we just don't ever really need sweaters...although lately it's been just chilly enough that I could really use one of those lightning sweaters. My sewing machine may be seeing some action this weekend.

Anywho, here we are, back again, with more stuff and fun things to look forward to. Expect at least one of the above projects to pop up by my own hand in the future. I have high hopes and big dreams and stuff!! AMBITION: IT'S GOOD FOR YOUR CIRCULATION.