
Happy Impending Gift-Giving Holiday everyone!! ARE YOU READY YET???
Yeah me neither. Let's be procrastinators together!!!
Dear readers, I have a confession. I have a mild but growing fetish for...

Neckties. I just recently discovered that I can pick them up for a dollar apiece at my local Goodwill, and well...let's just say it's over. There's no turning back. I adore neckties. They're like little soft, silky jewels, just waiting to be turned into something magical.
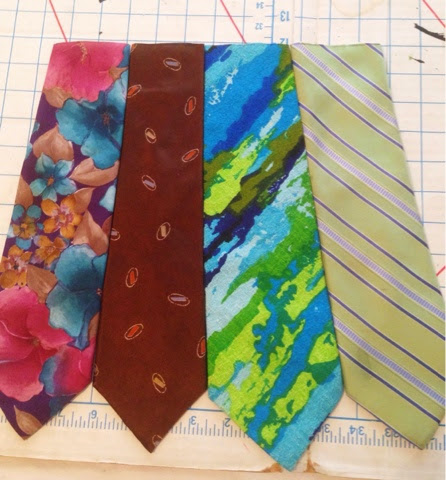
So, I made them into something that I think is pretty magical. Click "Read More" to find out how I turned these:

Into this:

UPDATE: I happened to make this again, incorporating a lot of my "Lessons Learned" (which you can find at the bottom of this post), and made it into an Instructable! You can find it HERE!
Okay so I IMPLORE you to read through this entire tutorial before starting off. I was literally making this up as I went along, and I have a thorough and helpful Lessons Learned section at the end, which you will definitely want to look at before you try this on your own.
First of all, you'll need the following stuff:
8 colorful neckties
A sewing machine
Roughly half a yard of lining fabric
A straight edge
A Sharpie
Pins and scissors and thread and all that good stuff
The Patience of a Saint
Arrange four neckties in a pleasing fashion for the front panel of your bag. (See Lesson Learned #1.)
Be sure to line up the bottoms - where the tops of the empty "triangles" are:

Keeping them carefully lined up, use a straight edge and a Sharpie to draw a straight line across about a half inch above where you want the top of the bag to be:

Cut each tie individually along that line:
Now, to sew them together, I just fed them into my sewing machine right next to each other - I didn't pin or right-sides-together or anything. I used the widest possible zig zag to keep them together. It was a little nerve-wracking at first, but I eventually got the hang of it:

Do the same above steps for your back purse panel:

Now use sharp scissors to trim the top edges so they're straight and even:

Now lay your lining fabric RIGHT SIDE DOWN and one of your purse panels RIGHT SIDE UP on top of it. (See Lesson Learned #2.)

Make sure that the bottom edge of the lining fabric lines up with the outer corners of your ties, as above. Now sew a line straight across the bottom:

Okay, er, mine isn't that straight. But you get the idea. Fortunately this is the back of the purse!
Then cut away the excess lining fabric so it matches your back panel perfectly, and sew up each side. Be sure to sew this seam about 3/4"-1" away from the edge so you have plenty of excess on the outside of the seam. You'll need it later.

Now fold over the top edge of your panel by half an inch or so and sew a straight seam roughly 3/8" away from the fold:

Clip the corners of the folded over part and trim away so it's pretty close to your seam:

Then sew a zig zag stitch along the raw edges so no unraveling occurs:

Repeat that entire lining/sewing/cutting/sewing/folding/sewing/trimming/sewing process for the other panel.
Now take two of the ties you cut up - pick your two favorites (see Lesson Learned #3):

Trim the wide raw edges so they're straight across, then, RIGHT SIDES TOGETHER, seam them up so you have one long tie-piece that's wider in the middle (we're going to call this the gusset piece for now):

Line up that center seam with a center seam on one of your panels and pin WRONG SIDES TOGETHER across the bottom of the panel. You want the gusset piece to line up so that the edge is laying JUST ABOVE the edge of your lining piece. Use lots of pins to achieve this if you need to. Do NOT sew the lining piece into this seam.

Sew it down, straight across:

Now with one loose end of your gusset piece, fold it upwards so it's sort of squared off and pin the very edge of it (the same edge that's currently sewed to the bottom of the panel) to the sides of the panel - ONLY PIN THE TIE TO THE TIE. In other words, you'll want to trim or fold back your lining piece so it's out of the way of your seam. Again, do not sew the lining into this seam:

Repeat that for the other side and sew both sides down carefully. You'll end up with something that looks like this:

...with the long narrow ends of the ties dangling off the top (those will be tied together to become your shoulder strap).
Now it gets a little tricky adding the other panel, and that's where you'll need to retrieve your Patience of a Saint. I'll wait while you look for that...
...
Did you find it? Good. Now you can continue.
Using the same method described above, pin the OTHER side of the gusset piece to the OTHER purse panel, again lining up the gusset so it's falling just outside the sewed-on lining. Pin the sides as well, as before.

I HIGHLY recommend sewing the bottom and sides SEPARATELY, as it will be very difficult to turn the corner because of the thickness of the ties. Just go slow, use a lot of pins, and don't forget to breathe.
Now.
You need closure, don't you? (See Lesson Learned #4.)
Cut about 12" of the narrow end of another one of your ties like so:

Fold over the raw edge and sew down:

Now cut ANOTHER piece off that tie that's about 2" wide.

If your tie has interfacing in it, remove that:

Taper the ends just a bit:

Fold each end over twice and sew down onto the front of your bag with a zig zag stitch:

Now as in the photo above, slide your narrow end piece through the slot and, with the bag closed tightly, fold this piece over to the back so you can see where it naturally falls:

Pin and stitch in place with a zig zag stitch.

And thus...

You have closure.

:)
Oh, you also have a finished bag:

Yay!!!

Look at that bag!! It's so awesome!!
Now! Pay attention, because I learned some things while doing this and I would do it differently next time. Here are my...
LESSONS LEARNED:
- Don't drive yourself crazy trying to arrange your ties in a pleasing fashion. Ties are not meant to go together - they're meant to be worn singularly as a stand-out to an otherwise boring outfit. The whole point of a necktie purse is to put crazy patterns and colors together, so don't stress too much. If I had to offer any specific advice, it would be:
- Pay attention to the widths of the ties and try to keep them consistent between front and back.
- Don't put two very wild prints next to each other - if you have two random-patterned florals, separate them with a simple stripe or a solid color.
- Pick colors you LIKE - not necessarily colors that go together. If you put a tie in there that you don't like, you'll always notice it.
- If you're going to do this "right" you probably shouldn't sew the lining right onto the backs of your panels. I'm not really even sure why I did that, since I've made dozens and dozens of lined bags and never have I lined a single one that way. So my advice is, follow all of the above instructions WITHOUT sewing the lining in - so you have the outside of the bag put together - then sew the lining separately and just insert it into the bag and sew across the top edge.
- When you're selecting your gusset/strap, you might want to pick one that is not the same as one of your outer panel ties, just so that you don't end up with two of the same tie pieces sewn right next to each other. Just a personal preference that I wish I'd thought of before I started.
- I CLEARLY should have sewn the closure pieces onto the outer bag panels BEFORE inserting the lining pieces. That was just silly.
Okay now that you're armed with a zillion pictures, a tutorial that probably has way too many steps, and a full log of mistakes I made, you should be pretty set, I'd think. :)
HEY I JUST REALIZED I have 8 ties left - that's enough to make another one! BRB!
XOXO
No comments:
Post a Comment