Hello all! I figured that since this is Hat #10, I ought to do something a little special. You're probably getting bored with all the knitted/crocheted hats I've been making lately, and frankly - so am I!
After about an hour scanning beautiful hats on Pinterest for inspiration, I felt sufficiently ready to do something a little crazy.
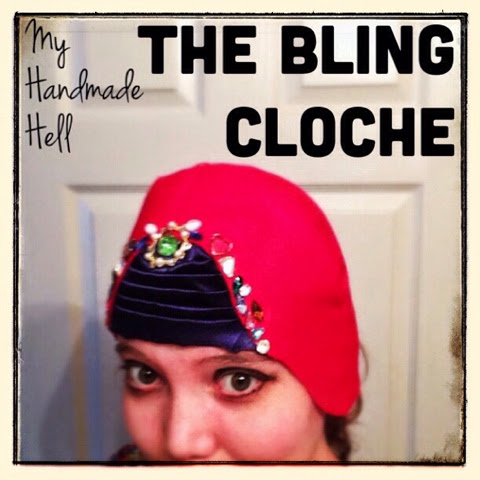
This cloche is pretty crazy. I'll be honest - it probably doesn't look that great on me. But if you look good in a 20's style cloche, this is the perfect project for you! It's simple, and the rhinestones add a pretty badass blingy effect.
And honestly? I can't remember when I've had so much fun posing for pictures in a handmade creation. I had some fun with filters too, to give it an old-fashioned look:


Super fun, right? This cloche is made out of plain old felt, a scrap of shiny fabric, and RHINESTONES!!! It covers the ears, so it's appropriate as a winter hat as well, but it doesn't have to. There are a million different ways you can make this hat. Click the jump for full instructions and MOAR PHOTOS!!
I love this hat. I love it! It's so sparkly and weird and artsy and cool. This was my first attempt, so some of the seams and what-not are a little wonky, but I will probably make another one later on that's even better - if I learn more useful tips and tricks, I'll be sure to share them!

First, you'll need 2 sheets of 9"x12" craft felt. Red is what I had, so red is what I used, but you can use whatever color you like. Black would be awesome too.
You'll also need a scrap of shiny polyester or satin fabric, a straight edge, measuring tape, matching thread, RHINESTONES, broken jewelry, tweezers (if you are using smaller rhinestones), and crystal glue. You could probably use E-6000 or superglue if you wanted. I wouldn't recommend using hot glue because it's a little too messy for a small-sized project like this.

First, take the following measurements:
-Around your head (over the ears if you want the hat to cover your ears, just above the ears if you don't) - I got 23.5"
-From the very top of your head to your hairline in the back - I got 8" exactly.
Fortunately, my measurements were just perfect for the 9"x12" felt I had, so I didn't need to make any adjustments to the length/width of the felt.
Cut both pieces of felt directly in half widthwise:

Then, stacking the four pieces together so you get it as identical as possible, cut the top into curved points - If your head height measurement is more than 8", cut it so that the top of the point is right at the top of the felt:

Stack one on top of the other and sew from the top to the bottom on one side. Repeat for the other two panels:

Both should be open on one side. Open those sides and press them together flat. You'll end up with an X-shaped piece like so:

Then sew down ONE side as you did with the other panels, from top to bottom:

When you unfold the pieces, it should look something like this:

Now, with all right sides together, you're going to sew the fourth side - but ONLY about halfway:

Try the hat on with the open side in front, and if you need to adjust any of your sewing lines, do that now. Once the hat is fitting the way you want it, make a mark with tailor's chalk or a pen just above your eyebrows on each side of the front opening:

Using that mark as your starting point, cut an S-shaped curve out of both sides of the front opening like so:

Now you should have a little triangular pointed piece at your forehead. That's where the pleated bit will go! You may want to do a little trimming to widen that piece - I wanted lots of the pleated panel to show, so I did a few alterations in this regard. But you don't have to if you just want a little peek-a-boo pleating!
Take your scrap of fabric and cut a long rectangle from it, wide enough to fit inside your triangular opening and about 3 times as long as the width measurement:

Begin pleating from the bottom, pinning each pleat on BOTH sides as you go. Depending on how slippery your fabric is, this part might be frustrating, but you will persevere! Just take your time and listen to soothing music.

Now carefully sew in place, moving in the same direction as your pleats as you sew, and removing the pins as you go:

Center the pleating underneath your open triangle on the hat, pin in place, and sew a line close to the edge of the felt.

Trim the edges of the pleating at the bottom if needed, and flip the hat inside out and trim away your excess:

Now for the fun part!!!
Take a piece of broken jewelry (I had this amazing circular jeweled piece that was PERFECT) and dab a little crystal glue on the back. Press it into the very center of the top of your pleated section and hold in place for at least 30 seconds, or until it's set. It is NOT dry yet so don't move it around!!
Then take your rhinestones and glue them on in a similar manner around the edge of the pleated section. Remember to press and hold firmly for at least 30 seconds for each one. I chose to match them up in pairs so the rhinestone detail was symmetrical, but of course you can do it however you want. You can have all the same rhinestones along the edges, or you can go to town with it and have a zillion different kinds!
Once the glue is dry, you're done!

Take a million pictures and have fun editing them. :)

You'll look like a silent movie star!

Variations:
Here are a few other ways I thought of to make this hat that you can try:
- Use black felt for the hat and white bridal fabric for the pleated panel. Adorn it with clear or white rhinestones and a single feather in the center front (anchored by a large rhinestone or a piece of broken jewelry) for a super sophisticated movie star look.
- Use white fleece or low-pile faux fur for the hat portion, black or some jewel-tone color for the pleated section, and embellish with red rhinestones for a luxurious wintry snow hat.
- Go monochromatic: all white with white/clear rhinestones, or all black with dark-colored rhinestones, or all red, or all gray or green or blue...this would be a great option for someone who likes the IDEA of this hat but isn't into all the bright colors.
Anyway, this hat is more for fun than anything else, but if you put your own spin on it based on your needs, it can be every bit as practical and useful as your average ribbed knit hat!
XOXO
No comments:
Post a Comment